Making Sprite-based Games with Canvas
The web is everywhere, and offers a very powerful and non-traditional environment for creating and distributing apps. Instead of the code-compile-run cycle, simply refresh your app or even write code live within the browser. Additionally, it's relatively painless to distribute your app across a huge number of platforms. It's exciting that in the past few years, developing games using HTML5, the technology behind the web, has become a reality.
The canvas element was introduced with HTML5 and provides an API for rendering on the web. The API is simple, but if you've never done graphics work before it might take some getting used to. It has great cross-browser support at this point, and it makes the web a viable platform for games.
Using canvas is simple: just create a <canvas> tag, create a rendering context from it in javascript, and use methods like fillRect and drawImage on the context to render shapes and images. The API has a lot of methods for rendering arbitrary paths, applying transformations, and more.
In this article, we're going to create a 2d game with canvas; a real game with sprites, animations, collision detection, and of course, explosions! What's a game without explosions?
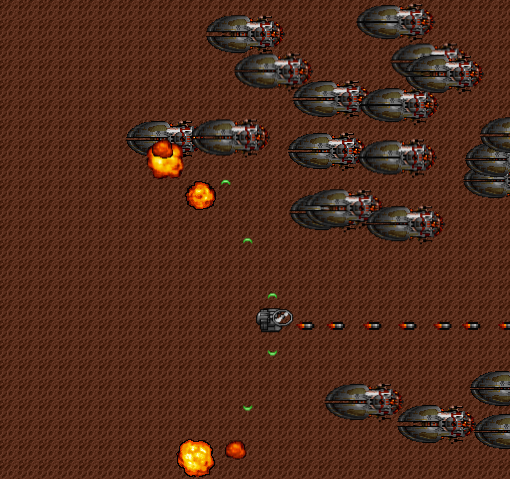
This is the game we're going to make (play it here). I wrapped this up into a game bootstrap project that you can use to quickly get started. I recomend checking out the source and running it locally by opening index.html.
Gearing Up
The game might look complex, but it really just boils down to a few technical components. I've always been amazed how far you can go with canvas, simple collision detection, some sprites, and a game loop.
However, in order to focus on the game components, I'm not going to fully explain every single line of code and API call. This tutorial is going to be somewhat advanced, but I hope that it's clear enough so that people of all skill levels can follow along. It's meant to explain basic game concepts, with a few more advanced techniques like sprite animations mixed in. This article assumes that you are familiar with JavaScript and basic HTML APIs. It also skims over the canvas API and some basic game concepts like the game loop.
For a more basic tutorial, check out How to make a simple HTML5 Canvas Game and HTML5 Snake source code walkthrough.
Using Free Graphics
It really sucks to try to make games for the first few times, because there's a lot to learn and you don't have any time to make cool graphics. I highly recommend using a free set of graphics until you have time to make your own.
HasGraphics is an awesome place to find free 2d graphics. I'm using the Hard Vacuum set for this example game.
You also learn how real graphics are stored and how to work with them. In this tutorial I will show how I integrated them.
Creating the Canvas
Let's start by digging into the code. Most of the game is in app.js in the js directory.
The very first thing we do is create the canvas tag, set the width and height, and add it to the body tag. We do this dynamically to keep everything in javascript, but you could add a canvas tag in the HTML file and use something like getElementById to get it too. There's no difference between these two methods, it's just a matter of preference where the canvas element is created.
// Create the canvas
var canvas = document.createElement("canvas");
var ctx = canvas.getContext("2d");
canvas.width = 512;
canvas.height = 480;
document.body.appendChild(canvas);
The canvas element has a getContext method which is what you use to get the rendering context. The context is the object on which you call all of the rendering APIs. You can also pass webgl if you want a WebGL context for 3d scenes.
From here on, we will be using the ctx variable to render everything.
Game Loop
You need a game loop that continually updates and renders the game. Here's what it looks like:
// The main game loop
var lastTime;
function main() {
    var now = Date.now();
    var dt = (now - lastTime) / 1000.0;

    update(dt);
    render();

    lastTime = now;
    requestAnimFrame(main);
};
You update and render the scene, and then use requestAnimationFrame to queue up the next loop. It's basically a smarter way of saying setTimeout(main, 1000 / 60), which attempts to render a 60 frames/second. At the very top of app.js we shim rAF as the requestAnimFrame function since not all browsers support it yet.
Never ever use setTimeout(main, 1000 / 60), as it's less accurate and also wastes a lot of cycles by rendering when unnecessary.
The update function takes the time that has changed since the last update. Never update your scene with constant values per frame (like x += 5;). Your game will run wildly different on various computers and platforms, so you need to update your scene independently of framerate.
This is achieved by calculating the time since last update (in seconds), and expressing all movements in pixels/second units. Movement then becomes x += 50 * dt, or "50 pixels per second".
Loading Resources and Starting the Game
The next section of code initializes the game and loads all resources. This uses one of the few separate utility classes that I wrote, resources.js. It's a very simple library that loads images and fires an event when they are all loaded.
Games require a lot of assets, like images, scene data, and so on. For 2d games, most or all of the assets are images. You need to load all your assets before starting the game so that they can be immediately used.
It's easy to load an image in javascript and do something when it's available:
var img = new Image();
img.onload = function() {
    startGame();
};
img.src = url;
This gets really tedious though if you have several images to load. You need to make a bunch of global variables, and in each onload check if all of them are loaded. I wrote a basic resource loader to handle all of this automatically. Get ready for some code!
(function() {
    var resourceCache = {};
    var loading = [];
    var readyCallbacks = [];

    // Load an image url or an array of image urls
    function load(urlOrArr) {
        if(urlOrArr instanceof Array) {
            urlOrArr.forEach(function(url) {
                _load(url);
            });
        }
        else {
            _load(urlOrArr);
        }
    }

    function _load(url) {
        if(resourceCache[url]) {
            return resourceCache[url];
        }
        else {
            var img = new Image();
            img.onload = function() {
                resourceCache[url] = img;

                if(isReady()) {
                    readyCallbacks.forEach(function(func) { func(); });
                }
            };
            resourceCache[url] = false;
            img.src = url;
        }
    }

    function get(url) {
        return resourceCache[url];
    }

    function isReady() {
        var ready = true;
        for(var k in resourceCache) {
            if(resourceCache.hasOwnProperty(k) &&
               !resourceCache[k]) {
                ready = false;
            }
        }
        return ready;
    }

    function onReady(func) {
        readyCallbacks.push(func);
    }

    window.resources = {
        load: load,
        get: get,
        onReady: onReady,
        isReady: isReady
    };
})();
The way this works is your game calls resources.load with all the images to load, and then calls resources.onReady to register a callback for when everything is loaded. This assumes that you won't call resources.load later in the game; it only works at startup.
It keeps a cache of images in resourceCache, and when the image loads it checks to see if all the requested images have loaded, and if so calls all the registered callbacks. Now we can just do this in our game:
resources.load([
    'img/sprites.png',
    'img/terrain.png'
]);
resources.onReady(init);
To get an image once the game starts, we just do resources.get('img/sprites.png'). Easy!
You can manually load images and start the game or use something like resources.js to make it easier.
In the above code, init is called when all the images are loaded, which creates the background pattern, hooks up the "Play Again" button, resets the game state, and starts the game.
function init() {
    terrainPattern = ctx.createPattern(resources.get('img/terrain.png'), 'repeat');

    document.getElementById('play-again').addEventListener('click', function() {
        reset();
    });

    reset();
    lastTime = Date.now();
    main();
}
Game State
Now we're rolling! Let's start implementing some game logic. At the core of every game is game state. This is data that represents the current state: a list of objects in the scene with position and other info, current score, time since the player last fired, and anything else.
This is all of the game state for our game:
// Game state
var player = {
    pos: [0, 0],
    sprite: new Sprite('img/sprites.png', [0, 0], [39, 39], 16, [0, 1])
};

var bullets = [];
var enemies = [];
var explosions = [];

var lastFire = Date.now();
var gameTime = 0;
var isGameOver;
var terrainPattern;

// The score
var score = 0;
var scoreEl = document.getElementById('score');
This looks like a lot, but it's not that complicated. Most of it is keeping track of when the player last fired a bullet (lastFire), how long the game has been playing (gameTime), if the game is over (isGameOver), the terrain pattern image (terrainPattern), and the score (score). There's also a list of objects in the scene: bullets, enemies, and explosions.
There's also the player entity, which keeps track of where the player is and the sprite state. Before we move on in the code, let's talk about entities and sprites.
Entities & Sprites
Entities
An "entity" is an object in the scene. Anything from a ship to a bullet to an explosion is an entity.
Entities in this system are simple javascript objects which keep track of where they are in the scene and more. This is a pretty simple system where we are manually handling each entity type, so there isn't any enforced structure. Each of our entities has pos and sprite field, and possibly more. For example, if we wanted to add an enemy to our scene, we would do:
enemies.push({
    pos: [100, 50],
    sprite: new Sprite(/* sprite parameters */)
});
This adds an enemy at x=100 and y=50 with the specified sprite.
Sprites & Animation
A "sprite" is an image that is rendered to represent an entity. Sprites are more complex because we want to animate them. Without animation, sprites could be simple images that are rendered with ctx.drawImage.
Animations are critical to a fun experience though, so it's really important that we implement it.
We can implement animations by loading several images and flipping through them over time. This is called keyframe animation.

If we alternate through these images back and forth, this is what it looks like:

In order to make it easier to edit each keyframe and load them, these images are commonly put all into one image, called a sprite map. You may already be familiar with this technique in CSS. In fact, many times several different sprite animations are contained in a single sprite map. Here's the sprite map for our example game (with a transparent background):
![]()
Like I mentioned at the beginning of this tutorial, I'm using the Hard Vacuum set of graphics. The set is a just bunch of bmp files, so I copied the individual graphics I needed and pasted them into a single sprite sheet. You'll need a simple graphics editor to do this (anything that can move pixels around should work). If you don't have one, you'll have to work with the existing formats and possibly change how the sprite animations load them. You could also find a different set or work with simple colored rectangles.
It would be difficult to manage all of these animations manually, however. This is where the second utility class comes in: sprite.js. This is a small file that wraps up the animation logic into a reusable type. Let's dig into it.
function Sprite(url, pos, size, speed, frames, dir, once) {
    this.pos = pos;
    this.size = size;
    this.speed = typeof speed === 'number' ? speed : 0;
    this.frames = frames;
    this._index = 0;
    this.url = url;
    this.dir = dir || 'horizontal';
    this.once = once;
};
This is the constructor for the Sprite class. It takes quite a number of arguments, but not all of them are required. Let's go through them one by one:
url: the path to the image for this spritepos: the x and y coordinate in the image for this spritesize: size of the sprite (just one keyframe)speed: speed in frames/sec for animatingframes: an array of frame indexes for animating: [0, 1, 2, 1]dir: which direction to move in the sprite map when animating: 'horizontal' (default) or 'vertical'once:trueto only run the animation once, defaults tofalse
The frames argument might need more explanation. The system assumes that all frames of an animation are the same size (the size passed in above). When animating, the system simply walks through the sprite map either horizontally or vertically (depending on dir) by starting at pos and incrementing by the x or y value of size. You need to specify frames to tell it how to walk, though, and each number references the frame to use. So [0, 1, 2, 3, 2, 1] would animate to the end and then reverse to the beginning.
Only url, pos, and size are required, since you might not need animation.
Every Sprite object has an update method for updating the animation, and it takes the length of time since last update just like our global update. Every sprite needs to be updated each frame.
Sprite.prototype.update = function(dt) {
    this._index += this.speed*dt;
}
Every Sprite object also has a render method for actually drawing itself. This is where most of the animation logic lives. It checks to see which frame it should render, calculates the coordinates within the sprite map, and calls ctx.drawImage to draw it.
Sprite.prototype.render = function(ctx) {
    var frame;

    if(this.speed > 0) {
        var max = this.frames.length;
        var idx = Math.floor(this._index);
        frame = this.frames[idx % max];

        if(this.once && idx >= max) {
            this.done = true;
            return;
        }
    }
    else {
        frame = 0;
    }


    var x = this.pos[0];
    var y = this.pos[1];

    if(this.dir == 'vertical') {
        y += frame * this.size[1];
    }
    else {
        x += frame * this.size[0];
    }

    ctx.drawImage(resources.get(this.url),
                  x, y,
                  this.size[0], this.size[1],
                  0, 0,
                  this.size[0], this.size[1]);
}
We use the 3rd form of drawImage which lets us specify an offset and size for the sprite and the destination separately.
Updating the Scene
Remember back in our game loop when we called update(dt) every frame? We need to define that function now, which needs to handle input, update all the sprites, update the positions of entities, and handle collision.
function update(dt) {
    gameTime += dt;

    handleInput(dt);
    updateEntities(dt);

    // It gets harder over time by adding enemies using this
    // equation: 1-.993^gameTime
    if(Math.random() < 1 - Math.pow(.993, gameTime)) {
        enemies.push({
            pos: [canvas.width,
                  Math.random() * (canvas.height - 39)],
            sprite: new Sprite('img/sprites.png', [0, 78], [80, 39],
                               6, [0, 1, 2, 3, 2, 1])
        });
    }

    checkCollisions();

    scoreEl.innerHTML = score;
};
Note how we add new enemies to the scene. We add an enemy if a random value is lower then a threshold, and it's added at the right side of the game just outside the view. It is randomly placed on the y axis by multiplying a random value by the canvas height minus the height of the enemy, so that the bottom doesn't cut any off. The value 39 is hardcoded because we know that's the height of the sprite. This code is simpler for the sake of the tutorial.
The threshold increases over time with the function 1 - Math.pow(.993, gameTime). Math.random returns a value between 0 and 1, and that function is about .13 at 20 seconds into the game, and slowly increases according to an exponential curve. The game is probably way too hard but it's illustrative.
Input
To handle input, I create one more utility library: input.js. This is very small library that simply keeps the state of the currently pressed keys by adding keydown and keyup event handlers to the document. I don't think it's worth posting here, but please go check it out on github.
The input library exports one single function, input.isDown, which takes a character such as 'a' and returns true if it's currently pressed. You can also pass 'SPACE', 'LEFT', 'UP' , 'RIGHT', and 'DOWN'.
Now we can handle input like this:
function handleInput(dt) {
    if(input.isDown('DOWN') || input.isDown('s')) {
        player.pos[1] += playerSpeed * dt;
    }

    if(input.isDown('UP') || input.isDown('w')) {
        player.pos[1] -= playerSpeed * dt;
    }

    if(input.isDown('LEFT') || input.isDown('a')) {
        player.pos[0] -= playerSpeed * dt;
    }

    if(input.isDown('RIGHT') || input.isDown('d')) {
        player.pos[0] += playerSpeed * dt;
    }

    if(input.isDown('SPACE') &&
       !isGameOver &&
       Date.now() - lastFire > 100) {
        var x = player.pos[0] + player.sprite.size[0] / 2;
        var y = player.pos[1] + player.sprite.size[1] / 2;

        bullets.push({ pos: [x, y],
                       dir: 'forward',
                       sprite: new Sprite('img/sprites.png', [0, 39], [18, 8]) });
        bullets.push({ pos: [x, y],
                       dir: 'up',
                       sprite: new Sprite('img/sprites.png', [0, 50], [9, 5]) });
        bullets.push({ pos: [x, y],
                       dir: 'down',
                       sprite: new Sprite('img/sprites.png', [0, 60], [9, 5]) });


        lastFire = Date.now();
    }
}
If the user presses the down arrow or the 's' key, we move the player up the y axis. The canvas coordinate system places (0, 0) at the top left, so moving up the y axis moves the object down the screen. We do the same for the up, left, and right keys.
Notice that we defined the playerSpeed variable at the top of app.js. Here are the speeds we defined:
// Speed in pixels per second
var playerSpeed = 200;
var bulletSpeed = 500;
var enemySpeed = 100;
By multiplying playerSpeed by the dt parameter, we calculate the correct amount of pixels to move for that frame. If 1 second has passed since that last update (which is the dt parameter), the player would move 200 pixels. If .5 seconds have passed, he would move 100 pixels. This shows a constant rate of movement independant of framerate.
The last thing we do is fire a bullet if the space button is pressed, the game isn't over, and it's been more than 100 milliseconds since the last bullet was fired. lastFire is a global variable that is part of the game state. It helps us control the rate of fire; otherwise the player could fire a bullet every frame! That's a little too easy, right?
var x = player.pos[0] + player.sprite.size[0] / 2;
var y = player.pos[1] + player.sprite.size[1] / 2;

bullets.push({ pos: [x, y],
               dir: 'forward',
               sprite: new Sprite('img/sprites.png', [0, 39], [18, 8]) });
bullets.push({ pos: [x, y],
               dir: 'up',
               sprite: new Sprite('img/sprites.png', [0, 50], [9, 5]) });
bullets.push({ pos: [x, y],
               dir: 'down',
               sprite: new Sprite('img/sprites.png', [0, 60], [9, 5]) });

lastFire = Date.now();
If we are firing a bullet, we add 3 bullet entities to the scene. The bullets array keeps track of all the bullets to the scene, so it's as simple as pushing them on there.
We calculate the position of the new bullets in the x and y variables. We add them at the position of the player, plus half the width and height of the player so that they shoot from the center of the ship.
We add 3 bullets because they shoot out from different directions. This makes the game easier because the player can't get "trapped" horizontally when they are lots of ships. To differentiate the types of bullets, we add a dir property to the entity with a value of 'forward', 'up', or 'down'.
Entities
All of the entities need to be updated. We have the single player entity and 3 arrays for bullets, enemies, and explosions.
function updateEntities(dt) {
    // Update the player sprite animation
    player.sprite.update(dt);

    // Update all the bullets
    for(var i=0; i<bullets.length; i++) {
        var bullet = bullets[i];

        switch(bullet.dir) {
        case 'up': bullet.pos[1] -= bulletSpeed * dt; break;
        case 'down': bullet.pos[1] += bulletSpeed * dt; break;
        default:
            bullet.pos[0] += bulletSpeed * dt;
        }

        // Remove the bullet if it goes offscreen
        if(bullet.pos[1] < 0 || bullet.pos[1] > canvas.height ||
           bullet.pos[0] > canvas.width) {
            bullets.splice(i, 1);
            i--;
        }
    }

    // Update all the enemies
    for(var i=0; i<enemies.length; i++) {
        enemies[i].pos[0] -= enemySpeed * dt;
        enemies[i].sprite.update(dt);

        // Remove if offscreen
        if(enemies[i].pos[0] + enemies[i].sprite.size[0] < 0) {
            enemies.splice(i, 1);
            i--;
        }
    }

    // Update all the explosions
    for(var i=0; i<explosions.length; i++) {
        explosions[i].sprite.update(dt);

        // Remove if animation is done
        if(explosions[i].sprite.done) {
            explosions.splice(i, 1);
            i--;
        }
    }
}
Let's start at the top: the player's sprite is updated by simply calling the update function on the sprite. This moves the animation forward.
The next 3 loops go through the individual bullets, enemies, and explosions. The process is the same for all of them: update the sprite, update the movement, and possibly remove it if it's offscreen. Since all entities can never change direction, there's no need to keep them in the scene when they move off, and it would only slow down our game the longer it is played.
The bullet's movement is the most complicated:
switch(bullet.dir) {
case 'up': bullet.pos[1] -= bulletSpeed * dt; break;
case 'down': bullet.pos[1] += bulletSpeed * dt; break;
default:
    bullet.pos[0] += bulletSpeed * dt;
}
If bullet.dir is 'up', we move the bullet down the y-axis (which moves it up the screen). The opposite for 'down', and the default case is to move forward along the x axis.
// Remove the bullet if it goes offscreen
if(bullet.pos[1] < 0 || bullet.pos[1] > canvas.height ||
   bullet.pos[0] > canvas.width) {
    bullets.splice(i, 1);
    i--;
}
Then we check to see if we should remove the bullet. The position is checked against the top, right, and bottom sides because bullets move up, right, and down. We don't make sure the whole bullet sprite is offscreen because the bullets move fast enough not to master. Simply checking the position (which is the top-left corner of the sprite) is enough.
To remove the bullet, we destructively modify the bullets array and decrement the i in the loop since the array has been modified. If we didn't do this, the next bullet would be skipped.
(Note: I wouldn't consider this a "best practice"; it's best to mark which ones need to be removed and remove them later. This fixes a lot of potential bugs with syncing issues, but for this tutorial we are keeping it simple. The right way to do it is to mark the object to be removed by setting a property like “toRemove” on it, and removing all the objects in a separate pass in the update method.)
Collision Detection
Now for something that everybody fears: collision detection! It's actually not as hard as it sounds, at least for our 2d game. It would be hard if we had to resolve collisions.
Resolving a collision means that you move one or both objects so that they are not colliding anymore. You need this for platformers where the player can run into a wall and the wall pushes back to stop him. For our game, we just need to make things explode!
There are 3 types of collisions we need to check:
- Enemies hit by bullets
- The player hit by an enemy
- The player hits the edge of the screen
Detecting 2d collisions is simple:
function collides(x, y, r, b, x2, y2, r2, b2) {
    return !(r <= x2 || x > r2 ||
             b <= y2 || y > b2);
}

function boxCollides(pos, size, pos2, size2) {
    return collides(pos[0], pos[1],
                    pos[0] + size[0], pos[1] + size[1],
                    pos2[0], pos2[1],
                    pos2[0] + size2[0], pos2[1] + size2[1]);
}
These two functions could be consolidated into one, but I find it easier to read this way. collides takes the coordinates for the top/left and bottom/right corners for both boxes and checks to see if there are any gaps.
Think of it this way: if r is the x coordinate of the right side of box A and x2 is the x coordinate of the left side of box B, if r <= x2 is true then there's a gap and no matter any other positions or sizes of the boxes there cannot be an overlap, so there is no collision. There are 4 checks: one for each sides of the boxes. If there's ever a gap: no collision.
Illustrations might help here, but this article isn't focusing on collision detection. You should be able to use the above functions without worrying too much about how it works. (Note: technically this is a very simplified form of the separating axis theorem). If you google "2d box collision" you will find this algorithm in several forms.
The boxCollides function is a wrapper around collides so that we can pass our native vector objects into it (which are simple 2-element arrays). It also converts our size values into absolute coordinates so it can compare the values.
And here's the mother lode of code that actually runs the collision detection:
function checkCollisions() {
    checkPlayerBounds();

    // Run collision detection for all enemies and bullets
    for(var i=0; i<enemies.length; i++) {
        var pos = enemies[i].pos;
        var size = enemies[i].sprite.size;

        for(var j=0; j<bullets.length; j++) {
            var pos2 = bullets[j].pos;
            var size2 = bullets[j].sprite.size;

            if(boxCollides(pos, size, pos2, size2)) {
                // Remove the enemy
                enemies.splice(i, 1);
                i--;

                // Add score
                score += 100;

                // Add an explosion
                explosions.push({
                    pos: pos,
                    sprite: new Sprite('img/sprites.png',
                                       [0, 117],
                                       [39, 39],
                                       16,
                                       [0, 1, 2, 3, 4, 5, 6, 7, 8, 9, 10, 11, 12],
                                       null,
                                       true)
                });

                // Remove the bullet and stop this iteration
                bullets.splice(j, 1);
                break;
            }
        }

        if(boxCollides(pos, size, player.pos, player.sprite.size)) {
            gameOver();
        }
    }
}
Collision detection is inherently exponential because you need to check collisions between all entities in the scene. For our game, we need to check every single enemy against every single bullet. The code loops through the enemies array and checks each enemy against all bullets by looping over the bullets array.
It calls boxCollides with the enemy and bullet's position and size (which is just the size of the sprite), and if it returns true does the following:
- Removes the enemy
- Adds to the score
- Adds an explosion entity
- Removes the bullet
- Stops the inner loop over bullets because the enemy doesn't exist anymore
We use the array splicing technique again to remove entities from an array. Again, this isn't a best practice, and it's better to mark enemies for removal and do it later, but this keeps the code simple.
Note how we create an explosion. You should be use to this pattern by now. We create an object with pos and sprite properties, and the sprite maps to the 13 frames of animation in the sprite map. Note that we pass true as the last argument which says to run the animation only once. The update loop checks for explosions that have finished and removes them.
Note these 3 lines of the checkCollisions function at the end of the loop over enemies:
if(boxCollides(pos, size, player.pos, player.sprite.size)) {
    gameOver();
}
pos and size are the position and size of the current enemy being checked, so this checks if the enemy has collided with the player. If it has, it signals a game over.
Lastly, let's talk about checkPlayerBounds. Here's what it looks like:
function checkPlayerBounds() {
    // Check bounds
    if(player.pos[0] < 0) {
        player.pos[0] = 0;
    }
    else if(player.pos[0] > canvas.width - player.sprite.size[0]) {
        player.pos[0] = canvas.width - player.sprite.size[0];
    }

    if(player.pos[1] < 0) {
        player.pos[1] = 0;
    }
    else if(player.pos[1] > canvas.height - player.sprite.size[1]) {
        player.pos[1] = canvas.height - player.sprite.size[1];
    }
}
It simply keeps the player inside the boundaries of the game by forcing it's x and y coordinates to be between 0 and canvas.width/canvas.height.
Rendering
We are almost done! We just need to define the render function which is called by our game loop to render the scene each frame. Here's what it looks like:
// Draw everything
function render() {
    ctx.fillStyle = terrainPattern;
    ctx.fillRect(0, 0, canvas.width, canvas.height);

    // Render the player if the game isn't over
    if(!isGameOver) {
        renderEntity(player);
    }

    renderEntities(bullets);
    renderEntities(enemies);
    renderEntities(explosions);
};

function renderEntities(list) {
    for(var i=0; i<list.length; i++) {
        renderEntity(list[i]);
    }
}

function renderEntity(entity) {
    ctx.save();
    ctx.translate(entity.pos[0], entity.pos[1]);
    entity.sprite.render(ctx);
    ctx.restore();
}
The first thing we do is render the background. We created the terrain pattern in the init function using the ctx.createPattern function, and we render it by setting the fillStyle of the context and rendering to the whole canvas with fillRect.
We then render the player, all bullets, all enemies, and all explosions. renderEntities loops through an array of entities and renders them. renderEntity uses canvas' transformations to place it on the screen. ctx.save saves the current transformation and ctx.restore restores it, obviously.
If you look back the sprite's render function, you'll see that it renders it at (0, 0), but our call to ctx.translate transforms it to the right place on the screen.
Game Over
The last little bit we need to do is handle the game over state. We need to define a gameOver function that shows a game over screen, and also reset which restarts the game.
// Game over
function gameOver() {
    document.getElementById('game-over').style.display = 'block';
    document.getElementById('game-over-overlay').style.display = 'block';
    isGameOver = true;
}

// Reset game to original state
function reset() {
    document.getElementById('game-over').style.display = 'none';
    document.getElementById('game-over-overlay').style.display = 'none';
    isGameOver = false;
    gameTime = 0;
    score = 0;

    enemies = [];
    bullets = [];

    player.pos = [50, canvas.height / 2];
};
gameOver displays the screen defined in index.html which says "Game Over" and has a button to restart.
reset sets all the game state back to the beginning and hides the game over screen, effectively restarting the game.
Note that back in init an event handler was added to the "play again" button shown in the game over screen which calls reset.
Making it Pretty
There's a tiny amount of css which centers the canvas, darkens the background, and styles the game over screen and other components.
Ideally you would scale the width and height of the canvas up if the game is being played on a larger screen. I will show how to do that in a future blog post.
Adding Sounds
This article focuses on rendering games with canvas, and skips over audio integration. I won't go into detail about it, but I'll point you to some resources to help you integrate sounds. The audio tag exists, of course, but for games we really need an API to play multiple sounds at once and have fine-grained control over them.
The web is slowly converging on the Web Audio API which provides advanced audio manipulation (as of June 2013). As of right now, only Chrome and Safari implement it, but Firefox and Opera should be getting it in the next version. This is a huge deal, as it has taken years to get good cross-browser audio support. Firefox has had the Audio Data API for a long time, but it failed to gain traction.
This article is a great intro to the Web Audio API. If you want to support older Firefox browsers (older than version 22), you'll have to add Audio Data API support as well as Web Audio. This page has several examples of the Audio Data API.
Eventually the game bootstrap project will include sample code for audio integration. I plan on writing another post detailing sound and other improvements to the game engine.
IE is the only one that doesn't provide an advanced audio API, as far as I know.
Final Thoughts
There's a lot to learn here, but I hope I've broken it down to simple enough pieces to show that making games is not that crazy. It just takes time to learn all the pieces needed. Please leave questions in the comments and I'd be happy to answer them!
I focused on using the raw canvas API to shine some light on how easy it is to create 2d games in the browser these days. Of course, there are several game engines that you can use if you want to get really complex. Most game engines standardize the interface for an entity, so all you have to do is define an update and render function for each type and a scene manager automatically calls them for all entities each frame.
Hey you, go create games like our example game!